Monday, 3 August 2015


Advantages PL/SQL  :
  • Procedural Language Supported:PL/SQL is a development tools that not only supported data Manipulation but also Provide the Condition, Checking, Looping or Branching Operation.
  • Reduces Network Traffic:PL/SQL is same entire block of SQL statement execute to the oracle engine at all at once so it's benefit to reduce the Network Traffic.
  • Error Handling:PL/SQL also permits during with Error Handling as required facility to Display User Friendly Error Message where errors are encounter.
  • Declare Variable:PL/SQL allow to declaration and use of variable in a block of code which variable will use to store intermediate result of query for later processing.
  • Intermediate Calculation:PL/SQL calculations done quickly and efficient without the use of oracle engines and improve the transaction.
  • Portable Application:Application are written in PL/SQL is portable in any computer or hardware for any system means Application independence to run any computer.


PL/SQL Block:
PL/SQL Block consists of three sections:
  • The Declaration section (optional).
  • The Execution section (mandatory).
  • The Exception (or Error) Handling section (optional).

PL/SQL Block:
DECLARE
Variable declaration
BEGIN
Program Execution
EXCEPTION
Exception handling
END;
Basic example :
DECLARE
message varchar2(20):= 'Hello, World!';
BEGIN
dbms_output.put_line(message);
END;
PL/SQL DATA TYPE:
  • Number type
Example :
no    number:=10;
(The NUMBER datatype is used to store fixed-point or floating-point numbers)
  • Character type
(CHAR data type is used to store fixed-length character data)
Example:
grade  CHAR(1);
.VARCHAR2
(The VARCHAR2 data type is used to store variable-length character data)
.Datetime  type
(The Datetime data types lets us store and manipulate dates, times, and intervals (periods of time). )
 .Boolean type:
(BOOLEAN data type is used to store the logical values TRUE, FALSE and NULL (which stand for a missing, unknown, or inapplicable value).)
IF-THEN syntax:
IF condition THEN
{
...statements to execute when condition is TRUE...
}
END IF;

IF-THEN EXAMPLE:
declare
no number:=&n;
begin
if no>0 then
dbms_output.put_line('is positive');
end if;
end;
if-then-else syntax:
IF condition THEN
{
...statements to execute when condition is TRUE...
}
ELSE
{
...statements to execute when condition is FALSE...
}
END IF;

IF-THEN ELSE  EXAMPLE:

declare
no number:=&n;
begin
if no>0 then
dbms_output.put_line('is positive');
else
dbms_output.put_line('is negative');
end if;
end

IF-THEN-ELSIF-ELSE syntax:
IF   condition1    THEN
{
...statements to execute when condition1 is TRUE...
}
ELSIF   condition2   THEN
{
...statements to execute when condition2 is TRUE...
}
ELSE
{
...statements to execute when both condition1 and condition2 are FALSE...
}
END IF;
IF-THEN-ELSIF-ELSE example:
DECLARE
grade CHAR(1);
BEGIN
grade := 'B';

IF grade = 'A' THEN
DBMS_OUTPUT.PUT_LINE('Excellent');
ELSIF grade = 'B' THEN
DBMS_OUTPUT.PUT_LINE('Very Good');
ELSIF grade = 'C' THEN
DBMS_OUTPUT.PUT_LINE('Good');
ELSIF grade = 'D' THEN
DBMS_OUTPUT. PUT_LINE('Fair');
ELSIF grade = 'F' THEN
DBMS_OUTPUT.PUT_LINE('Poor');
ELSE
DBMS_OUTPUT.PUT_LINE('No such grade');
END IF;
END;

Case  example:
DECLARE
grade CHAR(1);
BEGIN
grade := 'B';

CASE
WHEN grade = 'A' THEN DBMS_OUTPUT.PUT_LINE('Excellent');
WHEN grade = 'B' THEN DBMS_OUTPUT.PUT_LINE('Very Good');
WHEN grade = 'C' THEN DBMS_OUTPUT.PUT_LINE('Good');
WHEN grade = 'D' THEN DBMS_OUTPUT.PUT_LINE('Fair');
WHEN grade = 'F' THEN DBMS_OUTPUT.PUT_LINE('Poor');
END CASE;
EXCEPTION
WHEN CASE_NOT_FOUND THEN
DBMS_OUTPUT.PUT_LINE('No such grade');
END;

WHILE Loop   syntax:
WHILE  condition
LOOP
{
...statements...
}
END LOOP;

WHILE Loop   example:
declare
n number:=1;
begin
while n<10
loop
dbms_output.put_line(n);
n:=n+1;
end loop;
end;


For loop syntax:
FOR  loop_counter IN [REVERSE] lowest_number..highest_number
LOOP
{
...statements
...}
END LOOP;

For loop example:

declare
i number;
begin
for i in 1..10
loop
dbms_output.put_line(i);
end loop;
end;


Cursor   in Oracle:
create  table mytest
(id   int,
name varchar(200));
then insert values and use following code to learn.
for example:
insert into mytest values(1,'om');
then use following to learn cursor...
(1)simple way  select statement in pl-sql :
declare
enoint;
enamevarchar(200);
begin
select  id,name into eno,ename  from mytest where id='1';
dbms_output.put_line(eno||ename);
end;
(2) SELECT   USING     %TYPE:
declare
enomytest.id%type;
enamemytest.name%type;
begin
select  id,name into eno,ename  from mytest where id='1';
dbms_output.put_line(eno||ename);
end;

(3)cursor example  with %rowtype :
declare
en  mytest%rowtype;
cursor c1   is  select   *   from  mytest;
begin
open c1;
loop
fetch c1 into en;

dbms_output.put_line(en.id||en.name);

exit when c1%notfound;

end loop;
close c1;

end;


(4)cursor with %type example:
declare
enmytest.id%type;
enamemytest.name%type;

cursor c1   is  select   id,name   from  mytest  where id=1;
begin
open c1;
loop
fetch c1 into en,ename;

dbms_output.put_line(en||ename);

exit when c1%notfound;

end loop;
close c1;

end;


(5) parameterized     Cursor taking input from user(command line) :

declare
myno number;
cursor c1(en number)  is  select   *   from mytest where id=myno;
res  c1%rowtype;
begin
myno:=&en;
open c1(myno);

loop
fetch c1  into res;

dbms_output.put_line(res.id||res.name);

exitwhen c1%notfound;

end loop;
closec1;

end;


Thursday, 30 July 2015

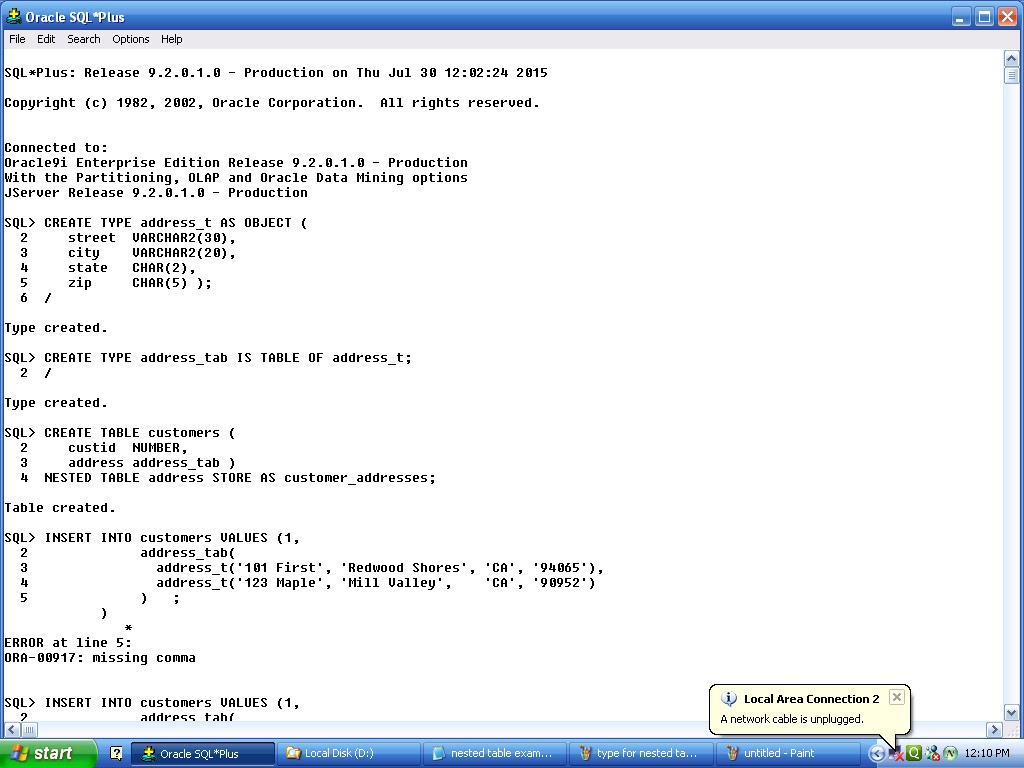
NESTED-TABLE-IN-ORACLE

NESTED TABLE EXAMPLES IN ORACLE:

(1)FIRST CREATE TYPE:

CREATE TYPE  address_t  AS   OBJECT (
   street  VARCHAR2(30),
   city    VARCHAR2(20),
   state   CHAR(2),
   zip     CHAR(5) );
/
(2)Creating  type  as   subtable:

CREATE TYPE address_tab IS TABLE OF address_t;

/ 

(3)CREATE MAIN TABLE:


CREATE TABLE customers (
   custid  NUMBER,
   address address_tab )
NESTED TABLE address STORE AS customer_addresses;

(4)INSET VALUES INTO NESTED TABLES:

INSERT INTO customers VALUES (1,
            address_tab(
              address_t('101 First', 'Redwood Shores', 'CA', '94065'),
              address_t('123 Maple', 'Mill Valley',    'CA', '90952')
            ));


(5)SELECTING VALUES:


Select * from  customers;


Tuesday, 28 July 2015

PL-SQL-IN -ORACLE(COMPLETE GUIDANCE)

INTRODUCTION TO PL/SQL:

•       PL/SQL is Very Usefully Language and Tools of Oracle to Manipulate, Control, Validate, and Restricted the Unauthorized Access of Data from the Database.
•       PL/SQL can improve the Performance of an Application and it is dealing with Error and return User Friendly Error Message.

Advantages PL/SQL  :

•       Procedural Language Supported: PL/SQL is a development tools that not only supported data Manipulation but also Provide the Condition, Checking, Looping or Branching Operation.
•       Reduces Network Traffic: PL/SQL is same entire block of SQL statement execute to the oracle engine at all at once so it's benefit to reduce the Network Traffic.
•       Error Handling: PL/SQL also permits during with Error Handling as required facility to Display User Friendly Error Message where errors are encounter.
•       Declare Variable: PL/SQL allow to declaration and use of variable in a block of code which variable will use to store intermediate result of query for later processing.
•       Intermediate Calculation: PL/SQL calculations done quickly and efficient without the use of oracle engines and improve the transaction.
•       Portable Application: Application are written in PL/SQL is portable in any computer or hardware for any system means Application independence to run any computer.


PL/SQL Block:

PL/SQL Block consists of three sections:
•       The Declaration section (optional).
•       The Execution section (mandatory).
•       The Exception (or Error) Handling section (optional).

PL/SQL Block:

DECLARE

     Variable declaration

BEGIN
     Program Execution

EXCEPTION

     Exception handling

END;

Basic example :

DECLARE
message varchar2(20):= 'Hello, World!';
BEGIN
dbms_output.put_line(message);
END;


PL/SQL DATA TYPE:
•      Number type
Example :
no    number:=10;
(The NUMBER datatype is used to store fixed-point or floating-point numbers)
•      Character type:
(CHAR data type is used to store fixed-length character data)
Example:
grade  CHAR(1);
.VARCHAR2
(The VARCHAR2 data type is used to store variable-length character data)
.Datetime  type
(The Datetime data types lets us store and manipulate dates, times, and intervals (periods of time). )
 .Boolean type:
(BOOLEAN data type is used to store the logical values TRUE, FALSE and NULL (which stand for a missing, unknown, or inapplicable value).)


IF-THEN syntax:
IF condition THEN
{
...statements to execute when condition is TRUE...
}
END IF;

IF-THEN EXAMPLE:
declare
no number:=&n;
begin
if no>0 then
dbms_output.put_line('is positive');
end if;
end;
if-then-else syntax:
IF condition THEN
{
...statements to execute when condition is TRUE...
}
ELSE
 {
...statements to execute when condition is FALSE...
}
END IF;

IF-THEN ELSE  EXAMPLE:

declare
no number:=&n;
begin
if no>0 then
dbms_output.put_line('is positive');
else
dbms_output.put_line('is negative');
end if;
end

IF-THEN-ELSIF-ELSE syntax:
IF   condition1    THEN
{
...statements to execute when condition1 is TRUE...
}
ELSIF   condition2   THEN
{
...statements to execute when condition2 is TRUE...
}
ELSE
 {
...statements to execute when both condition1 and condition2 are FALSE...
}
 END IF;
IF-THEN-ELSIF-ELSE example:
DECLARE
  grade CHAR(1);
BEGIN
  grade := 'B';
 
  IF grade = 'A' THEN
    DBMS_OUTPUT.PUT_LINE('Excellent');
  ELSIF grade = 'B' THEN
    DBMS_OUTPUT.PUT_LINE('Very Good');
  ELSIF grade = 'C' THEN
    DBMS_OUTPUT.PUT_LINE('Good');
  ELSIF grade = 'D' THEN
    DBMS_OUTPUT. PUT_LINE('Fair');
  ELSIF grade = 'F' THEN
    DBMS_OUTPUT.PUT_LINE('Poor');
  ELSE
    DBMS_OUTPUT.PUT_LINE('No such grade');
  END IF;
END;

Case  example:
DECLARE
  grade CHAR(1);
BEGIN
  grade := 'B';
 
  CASE
    WHEN grade = 'A' THEN DBMS_OUTPUT.PUT_LINE('Excellent');
    WHEN grade = 'B' THEN DBMS_OUTPUT.PUT_LINE('Very Good');
    WHEN grade = 'C' THEN DBMS_OUTPUT.PUT_LINE('Good');
    WHEN grade = 'D' THEN DBMS_OUTPUT.PUT_LINE('Fair');
    WHEN grade = 'F' THEN DBMS_OUTPUT.PUT_LINE('Poor');
  END CASE;
EXCEPTION
  WHEN CASE_NOT_FOUND THEN
    DBMS_OUTPUT.PUT_LINE('No such grade');
END;

WHILE Loop   syntax:
WHILE  condition 
LOOP
{
...statements...
}
END LOOP;

WHILE Loop   example:
declare
n number:=1;
begin
while n<10
loop
dbms_output.put_line(n);
n:=n+1;
end loop;
end;


For loop syntax:
FOR  loop_counter IN [REVERSE] lowest_number..highest_number
LOOP
{
...statements
...}
END LOOP;

For loop example:

declare
i number;
begin
for i in 1..10
loop
dbms_output.put_line(i);
end loop;
end;


Friday, 24 July 2015

Appcelerator-Cross-Platform-for mobile Apps development step by step guidance

(1)First create email id  on   gmail   for  Appcelerator   &  make sign up with 
(2)then they will send you confirmation email go to your gmail.com   &     confirm     it.

(3)After click on activate  link  go to make login on:

(4)after login into your  account just hit this url

 on  ur  address bar:


Click on 32 bit installer & download  .exe file for   Appcelerator   studio..


(5)And  Download the android  Sdk   into  your system from :

(6)And  then  After installation install     jdk  1.6   from  :


and after installation  open your  Appcelerator studio and 


 &    Try  your   first   demo   apps.....


NOte:

and also try through  CLI (command line) using cmd in windows stystem..


·         1 Ensure that you have Node.JS installed.
If you aren't sure, you can download above or you can verify by running the following in your console:
node --version
If it works, you will see a version such as v0.10.37.
·         2 Install the Appcelerator CLI
The Appcelerator CLI is installed using Node's Package Manager (npm). Once installed, you can manage different versions of the Appcelerator software.
npm install appcelerator -g
Once installed, you can use either appcelerator or the shorthand appc from the console to run the CLI.
·         3 After installation, you need to run setup to kick things off.
appc setup
When you run setup, the following will happen:
·         If this is the first time installing the CLI, it will automatically download the latest version.
·         Once installed, you will be prompted to login using your Appcelerator credentials.
·         If this is the first time installing for a new computer, you will need to authorize with an authorization code. The authorization code will be delivered to either your email or SMS-enabled phone (if configured).
·         Once you have authorized your computer, you're ready to use the CLI!
·         4 Once you have things setup, you're ready to create your first project!
appc new
A few quick notes about the CLI:
·         You can get more logging by using the -l trace option.
·         If the CLI encouters an error, you should find a file named appc-problem.log in your current working directory where you ran the command. This file contains detailed diagnostic information which can help support resolve your issue.


Building mobile applications:


http://docs.appcelerator.com/platform/latest/#!/guide/Appcelerator_CLI_Tasks-section-43306725_AppceleratorCLITasks-InstalltheCLI

Wednesday, 22 July 2015

Titanium Mobile -apps

(1)download & install titanium form:

"http://web.appcelerator.com/product/studio"


(1)installing titanium sdk:


http://docs.appcelerator.com/platform/latest/#!/guide/Installing_Titanium_SDK_Continuous_Builds


(2)installing titanium sdk :


http://docs.appcelerator.com/platform/latest/#!/guide/Installing_the_Android_SDK


(3)congiuring android sdk:


http://docs.appcelerator.com/platform/latest/#!/guide/Setting_up_Studio-section-37540095_SettingupStudio-ConfiguringAdvancedPlatformSettings


(4)titanium sdk:

go to help  click on install specific titanium sdk

enter following url

http://builds.appcelerator.com.s3.amazonaws.com/index.html#3.5.1


Android repository:

http://ubuntu.buct.edu.cn/android/repository/

Saturday, 11 July 2015

From validation using javascript

<html>
<head>
<title>Simple Client Side Validation</title>
<script  type="text/javascript">
function  valid()
{

if(myform.name.value=="")
{

alert("enter your name");

return false;

document.myform.name.focus();
}


if(myform.contact.value=="")
{
alert("enter your contact");
return false;
document.myform.contact.focus();
}

if(isNaN(myform.contact.value))
{

alert("enter numeric value in contact");
return false;
document.myform.contact.focus();
}


if(myform.city.value=="")
{

alert("enter your city");

return false;

document.myform.city.focus();

}

if(myform.email.value=="")
{

alert("enter your email");

document.myform.email.focus();

return false;

}

if(myform.address.value=="")
{

alert("enter your address");

document.myform.address.focus();

return false;
}
}
</script>
</head>
<body>
<form name="myform"  action="submit.php" method="post"  onsubmit="return(valid());" >

Name <input type="text" name="name"  >

contact<input type="text" name="contact">

city<input type=text   name="city">

email<input type=text name="email">

Address<textarea  rows=5  cols=5  name=address>
</textarea>
<input type=submit name=submit>
</form>
</body>
</html>

Addition of Two Numbers using javascript

n1 <input type = "number" id = "n1" value=15 />
n2 <input type = "number" id = "n2" value=20 />

<p>Sum?</p>
<button onclick="sum()">Try it</button>
<p id="demo2">Result?? </p>

<script type="text/javascript">

 function sum()
{
    var fn, ln;

    fn = document.getElementById("n1").value;

    ln = document.getElementById("n2").value;

    result =  (parseFloat(fn)+parseFloat(ln));

    document.getElementById("demo2").innerHTML = result;

}

</script>

Wednesday, 17 June 2015

PHP -Overloading- Concept

<?php

class test12

{
    public function __call($name, $arguments)

    {
        if ($name === 'test'){
            if(count($arguments) === 1 ){
                return $this->test1($arguments[0]);
            }
            if(count($arguments) === 2){
                return $this->test2($arguments[0], $arguments[1]);
            }
if(count($arguments) === 3){
                return $this->test3($arguments[0], $arguments[1],$arguments[2]);
            }

        }
    }

    private function test1($data1)
    {
       echo $data1;
    }

    private function test2($data1,$data2)
    {
       echo $data1.' '.$data2;
    }
private function test3($data1,$data2,$data3)
    {
       echo $data1.' '.$data2.$data3;
    }
}

$test = new test12();

$test->test('one argument');           //echoes "one argument"

$test->test('two','arguments');

$test->test('three','om','test');     //echoes "two arguments"


?>
output:
one argumenttwo argumentsthree omtest

Monday, 8 June 2015

UPLOAD -IMAGE -SCRIPT IN PHP & DISPLAY

(1)first write code for "uploadform.html" file:

<form  action="upload.php"     method="post"     enctype="multipart/form-data">
<input type="file"    name="file"   id="file" >
<input type=submit  name="upload"   value="upload">
</form>

(2)write code for  "upload.php"  file:
<?php

if(isset($_POST["upload"]))
{

$file=$_FILES["file"]["name"];

move_uploaded_file($_FILES["file"]["tmp_name"],"upload/".$_FILES["file"]["name"]);

$con=mysql_connect("localhost","root","");

mysql_select_db("data",$con);

$sql="insert into upload(file) values ('$file')";

mysql_query($sql);

}

?>

(3)write  code to  display images which is uploaded  "display.php"  file :

<?php

$con=mysql_connect("localhost","root","");

mysql_select_db("data",$con);

$sql="select * from  upload";

$result=mysql_query($sql);

while($row=mysql_fetch_array($result))
{

echo $row['file'];
echo '<img src=upload/'.$row['file'].'  heigth=200  width=300>';

}

?>

Wednesday, 3 June 2015

SEO INDEXING PAGES & SITEMAP

(1)how to check  indexed pages?

Ans:  to check pages are indexed or not indexed on following url:
(step 1) http://smallseotools.com/google-index-checker/     OR    CHECK ON THIS SITE      http://indexchecking.com/

(2)how to index your pages ?

(step 1)how to submit url for indexing page?

Ans: use following link  to submit your url:


(step 2): add property of all  urls:


click on add property  & submit your  website url: educationalgroup.netai.net


How to create “sitemap.xml”   file ?

(1)got to FOLLOWING  url:


enter your website url & click on start & after it you will find sitemap.xml  file download this sitemap.xml file & upload to your website..

Titanium installation for Android apps development using CLI INTERFACE

Install the CLI
1.    Install the titanium CLI. On Mac OS X and Linux, you may need to prefix this command with sudo.
npm install -g titanium
2.    Log in using your Appcelerator credentials.
titanium login
You are prompted for your Appcelerator Platform login and password.
3.    Install the latest released SDK.
titanium sdk install
4.    Configure CLI.
titanium setup quick
The script prompts you to enter basic information, such as your name, Appcelerator Platform e-mail login, default locale, default SDK version, default workspace folder and Android SDK home directory.
Configure the CLI
Use the CLI setup wizard to quickly configure your CLI options and platform settings. For example, running the titanium setup command with no options prompts you to enter basic information as well as your Android SDK home directory for Android development. The following command prompts you for advanced CLI options and additional platform settings:
titanium setup
Use the CLI config command to selectively change your CLI options and platform settings. For example, running the titanium configcommand with no options outputs your current configuration settings. If you have already setup the Android SDK and NDK, the following commands set your Android platform settings (on a Mac OS X system):
titanium config android.sdk /Users/appc/sdk/android-sdk/
titanium config android.ndk /Users/appc/sdk/android-ndk-r8b/
Note: Not all platforms need to be configured. For example, for iOS development, the CLI uses the xcode-select path to obtain the path to the Xcode development tools.
Update the CLI
To update the CLI tool, run the npm install command. On Mac OS X and Linux, you may need to prefix this commands with sudo.
npm install -g titanium
To update the Titanium SDK, run the titanium sdk install command. For example, running the command with no options installs the latest released version. The following command installs the lastest continuous integration build and makes it the default SDK version:
titanium sdk install --branch master --default
Create a Basic Project
The following CLI commands create a basic project then builds it. You need to have a platform SDK installed and configured, or else you can only build Mobile Web projects. For the Android platform, you need to have previously created an Android virtual device (emulator). To create a new emulator, see Native Android Debugging and Testing Tools.
When running these commands, you are prompted for missing information, such as the application ID and platforms, which may also be specified using command-line options.
titanium create --name MyFirstProject
cd MyFirstProject
titanium build


Titanium installation for Android apps Mobile Development

(1)download & install titanium form:

"http://web.appcelerator.com/product/studio"


(1)installing titanium sdk:


http://docs.appcelerator.com/platform/latest/#!/guide/Installing_Titanium_SDK_Continuous_Builds


(2)installing titanium sdk :


http://docs.appcelerator.com/platform/latest/#!/guide/Installing_the_Android_SDK


(3)congiuring android sdk:


http://docs.appcelerator.com/platform/latest/#!/guide/Setting_up_Studio-section-37540095_SettingupStudio-ConfiguringAdvancedPlatformSettings


(4)titanium sdk:


go to help  click on install specific titanium sdk

enter following url

http://builds.appcelerator.com.s3.amazonaws.com/index.html#3.5.1