Thursday, 30 July 2015

NESTED-TABLE-IN-ORACLE

NESTED TABLE EXAMPLES IN ORACLE:

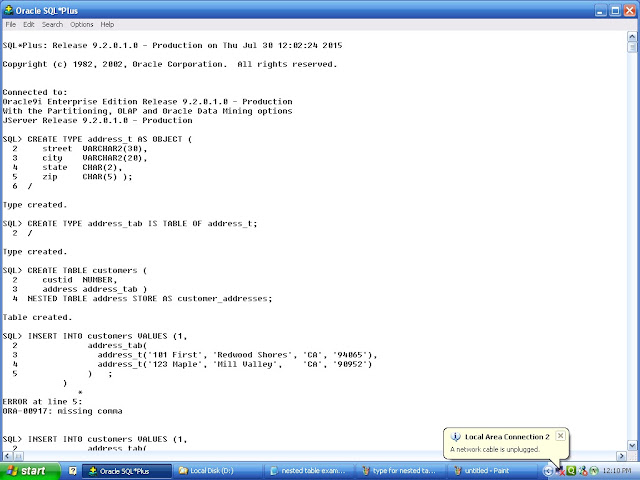
(1)FIRST CREATE TYPE:

CREATE TYPE  address_t  AS   OBJECT (
   street  VARCHAR2(30),
   city    VARCHAR2(20),
   state   CHAR(2),
   zip     CHAR(5) );
/
(2)Creating  type  as   subtable:

CREATE TYPE address_tab IS TABLE OF address_t;


(3)CREATE MAIN TABLE:


CREATE TABLE customers (
   custid  NUMBER,
   address address_tab )
NESTED TABLE address STORE AS customer_addresses;

(4)INSET VALUES INTO NESTED TABLES:

INSERT INTO customers VALUES (1,
            address_tab(
              address_t('101 First', 'Redwood Shores', 'CA', '94065'),
              address_t('123 Maple', 'Mill Valley',    'CA', '90952')
            ));


(5)SELECTING VALUES:


Select * from  customers;


Tuesday, 28 July 2015

PL-SQL-IN -ORACLE(COMPLETE GUIDANCE)

INTRODUCTION TO PL/SQL:

       PL/SQL is Very Usefully Language and Tools of Oracle to Manipulate, Control, Validate, and Restricted the Unauthorized Access of Data from the Database.
       PL/SQL can improve the Performance of an Application and it is dealing with Error and return User Friendly Error Message.

Advantages PL/SQL  :

       Procedural Language Supported: PL/SQL is a development tools that not only supported data Manipulation but also Provide the Condition, Checking, Looping or Branching Operation.
       Reduces Network Traffic: PL/SQL is same entire block of SQL statement execute to the oracle engine at all at once so it's benefit to reduce the Network Traffic.
       Error Handling: PL/SQL also permits during with Error Handling as required facility to Display User Friendly Error Message where errors are encounter.
       Declare Variable: PL/SQL allow to declaration and use of variable in a block of code which variable will use to store intermediate result of query for later processing.
       Intermediate Calculation: PL/SQL calculations done quickly and efficient without the use of oracle engines and improve the transaction.
       Portable Application: Application are written in PL/SQL is portable in any computer or hardware for any system means Application independence to run any computer.


PL/SQL Block:

PL/SQL Block consists of three sections:
       The Declaration section (optional).
       The Execution section (mandatory).
       The Exception (or Error) Handling section (optional).

PL/SQL Block:

DECLARE

     Variable declaration

BEGIN
     Program Execution

EXCEPTION

     Exception handling

END;

Basic example :

DECLARE
message varchar2(20):= 'Hello, World!';
BEGIN
dbms_output.put_line(message);
END;


PL/SQL DATA TYPE:
      Number type
Example :
no    number:=10;
(The NUMBER datatype is used to store fixed-point or floating-point numbers)
      Character type:
(CHAR data type is used to store fixed-length character data)
Example:
grade  CHAR(1);
.VARCHAR2
(The VARCHAR2 data type is used to store variable-length character data)
.Datetime  type
(The Datetime data types lets us store and manipulate dates, times, and intervals (periods of time). )
 .Boolean type:
(BOOLEAN data type is used to store the logical values TRUE, FALSE and NULL (which stand for a missing, unknown, or inapplicable value).)


IF-THEN syntax:
IF condition THEN
{
...statements to execute when condition is TRUE...
}
END IF;

IF-THEN EXAMPLE:
declare
no number:=&n;
begin
if no>0 then
dbms_output.put_line('is positive');
end if;
end;
if-then-else syntax:
IF condition THEN
{
...statements to execute when condition is TRUE...
}
ELSE
 {
...statements to execute when condition is FALSE...
}
END IF;

IF-THEN ELSE  EXAMPLE:

declare
no number:=&n;
begin
if no>0 then
dbms_output.put_line('is positive');
else
dbms_output.put_line('is negative');
end if;
end

IF-THEN-ELSIF-ELSE syntax:
IF   condition1    THEN
{
...statements to execute when condition1 is TRUE...
}
ELSIF   condition2   THEN
{
...statements to execute when condition2 is TRUE...
}
ELSE
 {
...statements to execute when both condition1 and condition2 are FALSE...
}
 END IF;
IF-THEN-ELSIF-ELSE example:
DECLARE
  grade CHAR(1);
BEGIN
  grade := 'B';
 
  IF grade = 'A' THEN
    DBMS_OUTPUT.PUT_LINE('Excellent');
  ELSIF grade = 'B' THEN
    DBMS_OUTPUT.PUT_LINE('Very Good');
  ELSIF grade = 'C' THEN
    DBMS_OUTPUT.PUT_LINE('Good');
  ELSIF grade = 'D' THEN
    DBMS_OUTPUT. PUT_LINE('Fair');
  ELSIF grade = 'F' THEN
    DBMS_OUTPUT.PUT_LINE('Poor');
  ELSE
    DBMS_OUTPUT.PUT_LINE('No such grade');
  END IF;
END;

Case  example:
DECLARE
  grade CHAR(1);
BEGIN
  grade := 'B';
 
  CASE
    WHEN grade = 'A' THEN DBMS_OUTPUT.PUT_LINE('Excellent');
    WHEN grade = 'B' THEN DBMS_OUTPUT.PUT_LINE('Very Good');
    WHEN grade = 'C' THEN DBMS_OUTPUT.PUT_LINE('Good');
    WHEN grade = 'D' THEN DBMS_OUTPUT.PUT_LINE('Fair');
    WHEN grade = 'F' THEN DBMS_OUTPUT.PUT_LINE('Poor');
  END CASE;
EXCEPTION
  WHEN CASE_NOT_FOUND THEN
    DBMS_OUTPUT.PUT_LINE('No such grade');
END;

WHILE Loop   syntax:
WHILE  condition 
LOOP
{
...statements...
}
END LOOP;

WHILE Loop   example:
declare
n number:=1;
begin
while n<10
loop
dbms_output.put_line(n);
n:=n+1;
end loop;
end;


For loop syntax:
FOR  loop_counter IN [REVERSE] lowest_number..highest_number
LOOP
{
...statements
...}
END LOOP;

For loop example:

declare
i number;
begin
for i in 1..10
loop
dbms_output.put_line(i);
end loop;
end;


Friday, 24 July 2015

Appcelerator-Cross-Platform-for mobile Apps development step by step guidance

(1)First create email id  on   gmail   for  Appcelerator   &  make sign up with 
(2)then they will send you confirmation email go to your gmail.com   &     confirm     it.

(3)After click on activate  link  go to make login on:

(4)after login into your  account just hit this url

 on  ur  address bar:


Click on 32 bit installer & download  .exe file for   Appcelerator   studio..


(5)And  Download the android  Sdk   into  your system from :

(6)And  then  After installation install     jdk  1.6   from  :


and after installation  open your  Appcelerator studio and 


 &    Try  your   first   demo   apps.....


NOte:

and also try through  CLI (command line) using cmd in windows stystem..


·         1 Ensure that you have Node.JS installed.
If you aren't sure, you can download above or you can verify by running the following in your console:
node --version
If it works, you will see a version such as v0.10.37.
·         2 Install the Appcelerator CLI
The Appcelerator CLI is installed using Node's Package Manager (npm). Once installed, you can manage different versions of the Appcelerator software.
npm install appcelerator -g
Once installed, you can use either appcelerator or the shorthand appc from the console to run the CLI.
·         3 After installation, you need to run setup to kick things off.
appc setup
When you run setup, the following will happen:
·         If this is the first time installing the CLI, it will automatically download the latest version.
·         Once installed, you will be prompted to login using your Appcelerator credentials.
·         If this is the first time installing for a new computer, you will need to authorize with an authorization code. The authorization code will be delivered to either your email or SMS-enabled phone (if configured).
·         Once you have authorized your computer, you're ready to use the CLI!
·         4 Once you have things setup, you're ready to create your first project!
appc new
A few quick notes about the CLI:
·         You can get more logging by using the -l trace option.
·         If the CLI encouters an error, you should find a file named appc-problem.log in your current working directory where you ran the command. This file contains detailed diagnostic information which can help support resolve your issue.


Building mobile applications:


http://docs.appcelerator.com/platform/latest/#!/guide/Appcelerator_CLI_Tasks-section-43306725_AppceleratorCLITasks-InstalltheCLI

Wednesday, 22 July 2015

Titanium Mobile -apps

(1)download & install titanium form:

"http://web.appcelerator.com/product/studio"


(1)installing titanium sdk:


http://docs.appcelerator.com/platform/latest/#!/guide/Installing_Titanium_SDK_Continuous_Builds


(2)installing titanium sdk :


http://docs.appcelerator.com/platform/latest/#!/guide/Installing_the_Android_SDK


(3)congiuring android sdk:


http://docs.appcelerator.com/platform/latest/#!/guide/Setting_up_Studio-section-37540095_SettingupStudio-ConfiguringAdvancedPlatformSettings


(4)titanium sdk:

go to help  click on install specific titanium sdk

enter following url

http://builds.appcelerator.com.s3.amazonaws.com/index.html#3.5.1


Android repository:

http://ubuntu.buct.edu.cn/android/repository/

Saturday, 11 July 2015

From validation using javascript

<html>
<head>
<title>Simple Client Side Validation</title>
<script  type="text/javascript">
function  valid()
{

if(myform.name.value=="")
{

alert("enter your name");

return false;

document.myform.name.focus();
}


if(myform.contact.value=="")
{
alert("enter your contact");
return false;
document.myform.contact.focus();
}

if(isNaN(myform.contact.value))
{

alert("enter numeric value in contact");
return false;
document.myform.contact.focus();
}


if(myform.city.value=="")
{

alert("enter your city");

return false;

document.myform.city.focus();

}

if(myform.email.value=="")
{

alert("enter your email");

document.myform.email.focus();

return false;

}

if(myform.address.value=="")
{

alert("enter your address");

document.myform.address.focus();

return false;
}
}
</script>
</head>
<body>
<form name="myform"  action="submit.php" method="post"  onsubmit="return(valid());" >

Name <input type="text" name="name"  >

contact<input type="text" name="contact">

city<input type=text   name="city">

email<input type=text name="email">

Address<textarea  rows=5  cols=5  name=address>
</textarea>
<input type=submit name=submit>
</form>
</body>
</html>

Addition of Two Numbers using javascript

n1 <input type = "number" id = "n1" value=15 />
n2 <input type = "number" id = "n2" value=20 />

<p>Sum?</p>
<button onclick="sum()">Try it</button>
<p id="demo2">Result?? </p>

<script type="text/javascript">

 function sum()
{
    var fn, ln;

    fn = document.getElementById("n1").value;

    ln = document.getElementById("n2").value;

    result =  (parseFloat(fn)+parseFloat(ln));

    document.getElementById("demo2").innerHTML = result;

}

</script>